Critical Path Method (CPM) in Project Management

The critical path method (CPM) is a project management technique that’s used by project managers to create an accurate project schedule. The CPM method, also known as critical path analysis (CPA), consists in using the CPM formula and a network diagram to visually represent the task sequences of a project. Once these task sequences or paths are defined, their duration is calculated to identify the critical path.


Finding the critical path is very helpful for project managers because it allows them to:

  • Accurately estimate the total project duration.
  • Estimate the time that’s necessary to complete each project task.
  • Identify critical activities which must be completed on time and require close supervision.
  • Find out which project tasks can be delayed without affecting the project schedule by calculating slack for each task.
  • Identify task dependencies, resource constraints and project risks.
  • Prioritize tasks and create realistic project schedules.

Once done by hand, the critical path can now be calculated automatically with project scheduling software equipped with Gantt charts, which makes the CPM method much easier. ProjectManager is project management software that helps you quickly implement the critical path method. Build a project schedule on our award-winning Gantt chart, then simply filter for the critical path. When it’s time to execute, your team can collaborate with a task list, kanban board or calendar. And you can track everything with dashboards and reports to ensure you stay on track. Get started today absolutely free.

ProjectManager's shows you the critical path of a project automatically

ProjectManager can calculate the critical path for you on our award-winning Gantt charts—learn more.

The critical path method was developed in the late 1950s by Morgan R. Walker and James E. Kelley. The origins of the critical path method are closely related to the Program Evaluation and Review Technique (PERT), a similar method that is commonly used in conjunction with CPM in project management.

CPM vs. PERT

The critical path method (CPM) and program evaluation and review technique (PERT) are both project scheduling techniques. But they aren’t interchangeable. We’ve been talking about CPM, but before we compare it to PERT let’s define the term.

PERT is used to get accurate time estimates for complicated projects. It uses an algorithm to calculate the estimated duration for unpredictable activities. It focuses on events and milestones on a PERT chart with nodes in the wireframe when developing projects.

However, while these are two different techniques, PERT and CPM can be used together for project planning and scheduling. The difference between them lies in that PERT is about time planning and time management, while CPM is about time and budgeting. PERT delivers a project quickly and CPM gets the project done on budget and on time.

Now that we know what’s the critical path of a project, we can learn about the critical path method (CPM), an important project management technique that’s based on this concept.

When Should You Use Critical Path Analysis?

Critical path analysis is another way of referring to the critical path method. As noted, it’s used by industries with complex projects, such as aerospace, defense, construction and product development.

Therefore, critical path analysis is a crucial first step in developing a project schedule. It’s done early in the life cycle of a project, usually in the planning phase, but it’s not unheard of to have CPM as part of a project proposal before the project has been approved.

By understanding which are the critical tasks in a project you can focus on getting those done if time, resources and costs are an issue. Knowing this in advance of executing a project will help you deliver that project successfully.

Related: Free Project Plan Template

What Is the Importance of CPM in Project Management?

Projects are made up of tasks that have to adhere to a schedule in order to meet a timeline. It sounds simple, but without mapping the work, your project scope can quickly get out of hand and you’ll find your project off track.

Using the critical path method is important when managing a project because it identifies all the tasks needed to complete the project. It then determines the tasks that must be done on time, those that can be delayed if needed and how much float or slack you have.

When done properly, critical path analysis can help you:

  • Identify task dependencies, resource constraints and project risks
  • Accurately estimate the duration of each task
  • Prioritize tasks based on their float or slack time, which helps with project scheduling and resource allocation
  • Identify critical tasks that have no slack and ensure those are completed on time
  • Monitor your project progress and measure schedule variance
  • Use schedule compression techniques like crash duration or fast tracking

Critical Path Diagram

As you can see in this critical path diagram, project activities are represented by letters and the critical path is highlighted in green. Tasks F, G and H are non-critical activities with float or slack. We can also identify task dependencies between the critical path activities, and also between activities (A, F and G) or (A, H and E), which are parallel tasks.

critical path example

Critical Path Method (CPM) Formula

Before we learn how to use the CPM formula, we need to understand some key CPM concepts.

  • Earliest start time (ES): This is simply the earliest time that a task can be started in your project. You cannot determine this without first knowing if there are any task dependencies
  • Latest start time (LS): This is the very last minute in which you can start a task before it threatens to delay your project timeline
  • Earliest finish time (EF): The earliest an activity can be completed, based on its duration and its earliest start time
  • Latest finish time (LF): The latest an activity can be completed, based on its duration and its latest start time
  • Float: Also known as slack, float is a term that describes how long you can delay a task before it impacts its task sequence and the project schedule. The tasks on the critical path have zero float because they can’t be delayed

The critical path method formula has two parts; a forward pass and a backward pass.

Forward Pass in CPM

Use the CPM diagram and the estimated duration of each activity to determine their earliest start (ES) and earliest finish (EF). The ES of an activity is equal to the EF of its predecessor, and its EF is determined by the CPM formula EF = ES + t (t is the activity duration). The EF of the last activity identifies the expected time required to complete the entire project.

Backward Pass in CPM

Begins by assigning the last activity’s earliest finish as its latest finish. Then the CPM formula to find the LS is LS = LF – t (t is the activity duration). For the previous activities, the LF is the smallest of the start times for the activity that immediately follows.

Critical Path Method Example

Let’s take a look at a critical path example to better understand how the critical path method is used in project management. Although it’s high-level, it can help you visualize the meaning of a CPM schedule.

We’ll use this critical path diagram to explain the elements that make up the critical path analysis process. To keep things simple, we’ve already done the calculations for this example using the CPM formula.

critical path method example

The above critical path method example shows the critical path for getting a website online. All the tasks that are scheduled to build and launch the website are shown in the rectangular nodes.

Some of the tasks are being done at the same time as others. For example, the work on defining a target market is being done as the design is being done and the content for the site is being drafted.

However, not all these tasks are equally important. Some aren’t critical to getting the site live by the deadline. That’s where the critical path comes in. It has identified by the colored arrows all the tasks that must be done in order to complete the project plan on time.

Critical Path Method Steps

Now that you know the key concepts of the critical path method, here’s how to calculate the critical path in 8 steps.

1. Collect Project Activities

Use a work breakdown structure to collect all the project activities that lead to the final deliverable.

2. Identify Task Dependencies

Determine which tasks are dependent on other tasks before they can begin. Use your judgment and your team members’ feedback. Failing to define task dependencies correctly makes the critical path method useless.

3. Create a Critical Path Diagram

A CPM diagram or network diagram, depicts the order of activities.

4. Estimate the Timeline

To use the critical path method, you’ll need to estimate the duration of each task. Use data from past projects and other sources of information such as subject matter experts.

5. Use the Critical Path Formula

The critical path uses an algorithm, also referred to as the CPM formula. That algorithm has two parts, the forward pass and the backward pass. The forward pass is determined by using the earliest start for each activity (ES) and the earliest finish (EF). The ES of an activity equals the EF of the one before it. The EF is calculated by EF = ES + t (the duration of an activity).

The backward pass assigns the last activity’s EF as its latest finish. Then use the CPM formula to find the LS, which is LF – t. For the activities before that, LF is the smallest of the start times for the next activity.

6. Identify the Critical Path

The activities with 0 float make up the critical path. All of these critical path activities are dependent tasks except for the first task in your CPM schedule. All project tasks with positive slack are parallel tasks to the critical path activities.

7. Revise During Execution

Continue to update the critical path diagram as you go through the project execution phase. These critical path analysis steps determine what tasks are critical and which can float, meaning they can be delayed without negatively impacting the project schedule. Now you have the information you need to plan the critical path schedule more accurately and have more of a guarantee you’ll meet your project deadline.

You also need to consider other changes or constraints that might change the project schedule. The more you can account for these unexpected events or risks, the more accurate your critical path schedule will be. If time is added to the project because of these constraints, that’s called a critical path drag, which is how much longer a project will take because of the task and constraint.

Benefits of Using CPM in Project Management

There are many reasons to use the critical path method. It’s a great project management tool to help you deliver your project on time and within budget, but we’ve already discussed that at length. Here are some other benefits of using CPM.

Critical Path Analysis Improves Team Communication

It fosters better communication within the project team. Everyone is involved in providing input and that brings the expertise of various project team members together for the better good of the project as a whole. This includes subcontractors, architects, electricians, construction managers, etc.

CPM Helps Prioritize Tasks

Naturally, having determined the critical path is going to help you prioritize your work. You know the tasks that must be done and that gives you wiggle room if there are issues with time or cost. You might not get every activity done, but you’ll get the ones finished that are critical to the project.

CPM & PERT Help Create Accurate Schedules

The critical path method will help you make a more accurate project schedule, especially when you use it in conjunction with PERT charts. You can estimate better and discover areas of risk and prepare to respond to them to avoid costly delays.

CPM & Gantt Charts Help Map Out Project Plans

Another benefit is the visual nature of CPM, especially when mapped on the timeline of a Gantt chart. Having a visual element to communicate the project schedule is always a plus. Not everyone absorbs information in the same way. Visual tools help teams better understand what’s expected of them and when it’s expected.

CPM & Project Management Software

As stated, the critical path method (CPM) was first invented in the late 1950s. During those times, project scheduling software didn’t exist, and project managers had to calculate the critical path manually.

Fortunately, today there are many project management software alternatives that can help with the critical path process. Most of them use Gantt charts to represent CPM diagrams and calculate the critical path, but their feature sets vary greatly. One of the most commonly used project management software to identify the critical path is Microsoft Project. However, it has major drawbacks that make ProjectManager a better choice.

Here are some of the main features that you’ll need as a project manager to properly use the critical path method for your scheduling process.

Must-Have Features of Critical Path Software

Link Tasks and Avoid Bottlenecks

Tasks that are dependent on another need to be a part of your critical path calculation. There are four types: those that are start-start, start-stop, stop-start and stop-stop. By identifying these task dependencies, you can avoid bottlenecks later in the project.

A screenshot of ProjectManager’s Gantt chart, with the critical path and lines between the bars that represent task dependencies

How to Find the Critical Path With ProjectManager

Figuring out the critical path by hand takes time, and it must be done throughout the project, which is why using project management software streamlines the process. ProjectManager is award-winning software that automates the critical path method process for you.


1. Start a Project With a Gantt Chart

Managing a project on Gantt charts allows you to both plan and schedule in one place. Add your tasks and their durations, and they’ll automatically appear on a project timeline, allowing you to see your whole project at once.

In the software, upload your tasks manually or upload a pre-existing spreadsheet. Add task descriptions, deadlines, priority, tabs and assign them to one or more team members. We also provide templates to help you get started.

ProjectManager's Gantt chart, showing the critical path of a construction project

2. Add Task Dependencies

In the software, connect your dependent tasks on the Gantt chart by dragging one onto the other. You’ll see a dotted line indicating that the tasks are linked, and you can then define the type of dependency it is.

3. Set the Project Baseline

Setting the baseline is possible when you’ve finished making your project schedule, complete with deadlines and costs. The baseline captures your data and uses it to compare against your actual progress.

On the Gantt chart, create your baseline for the project by adding the start date to the task and when it’s due to be completed. These planned start and end dates will be compared to your actual project data and show you whether you’re on target.

4. See the Critical Path

Easily find the critical path of your project by using our critical path filter. This helps you know what must be done to complete the project and shows if you’re experiencing any slippage.

5. See Your Overview With a Dashboard

Now that you’ve got your project planned out, viewing it from a dashboard is the best way to get a high-level view of your progress.

From the dashboard view, track if your project is proceeding as planned. Our dashboard monitors several project metrics, such as variance, tasks and more, automatically calculating your data to display it in easy-to-read charts and graphs.

ProjectManager’s dashboard view, which shows six key metrics on a project

6. Report on Progress

Reporting is crucial to pull data from your project and get and share insights into how it’s doing. Reports come in many varieties, which together provide a snapshot of the whole project’s performance.

Easily generate reports on the critical path, task progress, project status, costs and more in the software. We do the calculations for you, and you can filter the results to show just what you want to see. Our reporting feature is done 

16Shares
facebook sharing button
twitter sharing button
pinterest sharing button
linkedin sharing button

How to Make a CPM Schedule: CPM Scheduling Basics

Project managers know the critical path. It’s the longest sequence of tasks that must be completed to deliver the project, and these tasks are referred to as critical activities. Delaying any of them delays the overall schedule. A CPM schedule or critical path method schedule uses the critical path when scheduling a project.

Using a CPM schedule gives project managers valuable insights into the planning phase of their projects. It also helps keep the project on schedule by focusing on what must be done and knowing what can be skipped if necessary. Every project manager should have a CPM schedule in their toolbox. Learn how to make one, leverage some free templates to help and find out how CPM software facilitates the process.

What Is a CPM Schedule?

A CPM schedule is used to plan and control a project. It identifies the activities that will take the longest amount of time to complete that project while still delivering all critical activities. This is called the critical path and it controls the project duration. A CPM schedule gives each activity an early start date and a late start date. This timetable is visualized in a network diagram or Gantt chart.

A critical task has a zero run-time reserve, which means if the task duration changes, the schedule of the entire project will be affected. This is a negative impact that’ll end up being not only costly but will also add time to the schedule and possibly introduce risks. That’s why critical tasks in a CPM schedule require control and timely detection of risks.

The critical path method is widely used in the transportation market, but it can apply to construction, aerospace and defense, software development, research, product development, engineering and plant maintenance projects, just to name a few. CPM schedules are so widespread because they visualize the schedule graphically and prioritize the critical activities that need attention.

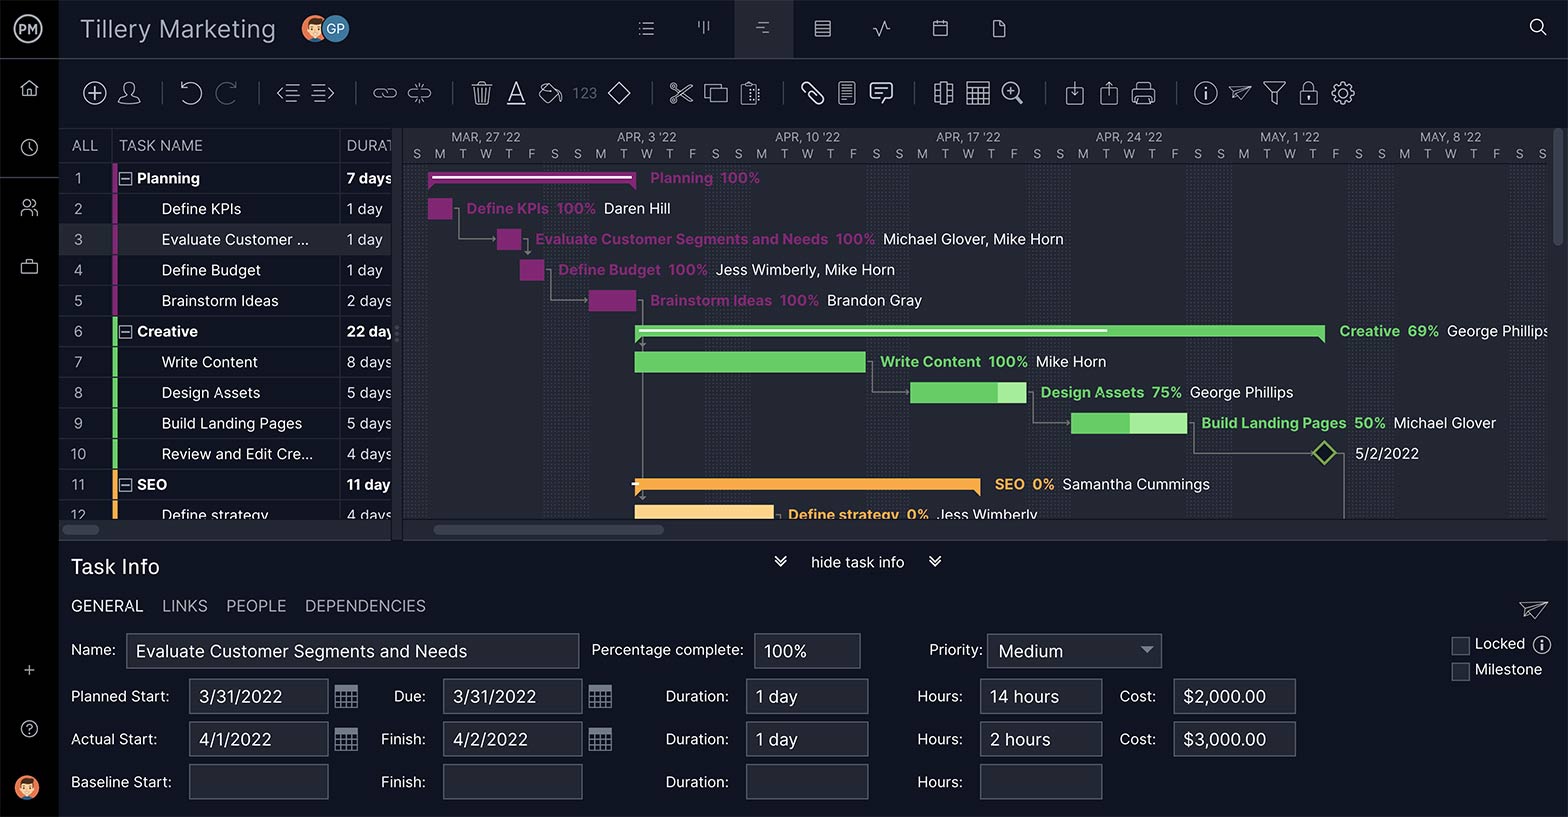
Determining the critical path is time-consuming and project managers have turned to project management software to help. But not all software has that feature. ProjectManager is online project management software with robust Gantt charts that filter for the critical path. There’s no work for you other than a keystroke. Our Gantt charts also let you set a baseline once you’ve made your project plan. Now you can track your planned effort against your actual effort in real time to help stay on schedule. Get started with ProjectManager today for free.

For What Is a CPM Schedule Used?

A CPM schedule is a planning technique that helps project managers see what must be done in their projects and how long it’ll take. It provides insight when planning a project, allocating resources and, of course, scheduling tasks or activities.

Project managers use a CPM schedule for both current and future projects because a CPM schedule can evaluate expectations and compare them to actual progress. The data collected in the project you’re working on now can help you schedule the next project more accurately.

Scheduling isn’t only about duration and deadlines. There are resources that must be allocated. A CPM schedule makes resource management more effective by allowing project managers to prioritize tasks because they can see when and how they’ll need to best deploy them.

Even the best schedules are going to run into issues that will cause delays. Project managers work to avoid issues that can negatively impact the project’s timeline. A CPM schedule does this by helping them avoid bottlenecks. Bottlenecks can be avoided by knowing the tasks that can and cannot be run in parallel when scheduling the project.

What Should You Include in a CPM Schedule?

To make a CPM schedule, you first have to know its components which are listed below.

  • Tasks: One single unit of work in a larger chain of activities that leads to a deliverable or completed project.
  • Earliest start date: The earliest point in the schedule on which an activity can begin.
  • Latest start date: The latest point in the schedule on which an activity can begin.
  • Earliest finish date: The earliest point in the schedule on which an activity can end.
  • Latest finish date: The latest point in the schedule on which an activity can end.
  • Crash duration: The shortest amount of time to complete an activity.
  • Task dependencies: When one task must end or begin before another can begin or end. There are four types of task dependencies—finish to start, finish to finish, start to start and start to finish.
  • Project milestones: A major point in a project schedule, such as the start or finish of a project phase.

How to Make a CPM Schedule

Now that we understand the terms, it’s time to create a CPM schedule. This can be done over the course of the below seven steps. As you can see, it takes some time. While important to understand, project management software like ProjectManager does this work for you. Simply filter for the critical path and you’ll see it on the timeline of your Gantt chart. But if you don’t have project management software, then follow these steps.

1. List All Your Project Tasks

To begin, you must know all the activities that’ll make up your project. A work breakdown structure (WBS) is a tree diagram that allows you to identify all deliverables in the project and the tasks that’ll create them. Your final deliverable is on top and all those activities that lead you there are hierarchically listed below. Once you’ve completed a WBS, you’ll have all the work necessary for the project schedule.

2. Estimate Start and Finish Dates

The next step is to estimate the duration of each task you identified in the previous step. Not only will you try to figure out how long each task will take, but you want to determine as best you can the start and finish dates. Meet with your project team to help you get the most accurate forecast. They’re skilled and experienced so their input is invaluable.

3. Determine the Slack for Each Task

Slack, also called float, is the amount of time that a task can be delayed without negatively impacting the next task and the overall project schedule. In other words, when a task has slack, you know it can be delayed for a specific amount of time. This is called a non-critical task. No activities on the critical path have any slack and cannot be delayed. That’s why they are critical to the project.

4. Identify Task Dependencies

As the name suggests, a task dependency is one that relates to another. Tasks that are dependent must be identified as they can cause bottlenecks later in the execution of the project. As defined above, there are four types of task dependencies and you should note which type of dependent task each one is. When you identify the task dependencies in your project, you’ll be able to better determine the project’s critical path.

5. Draw a CPM Diagram

In order to perform critical path analysis, you need to draw a CPM diagram. This is a type of network diagram and will take time and a lot of manual work (unless, of course, you use project management software). Be careful, doing this by hand is more likely to produce errors that can mess up your results.

6. Identify the Critical Path

Now that you’ve drawn a CPM diagram, you can identify the critical path. As stated above, it will be made up of activities that have no slack. The critical path is the activities on your CPM diagram that cannot be delayed. It is the longest duration in the project.

7. Finish Your CPM Schedule

With the critical path identified, you can now schedule your project. It’s easy to see the critical tasks and the non-critical tasks. You have also identified task dependencies, which will help you avoid bottlenecks. But once you’ve scheduled the project, you’re not done. You’ll need to review and revive the schedule as you execute the project. Any issues or delays will impact the critical path and you’ll likely have to redo it over the course of the project’s life cycle. Continue to analyze and update the CPM schedule throughout the project.

Free Project Management Templates

As you can see, a lot of work goes into making a CPM schedule. There are, however, some shortcuts that can help. ProjectManager has dozens of free project management templates for Excel and Word that cover every phase of the project. Here are a few that can make a CPM schedule less arduous.

Project Timeline Template

A CPM schedule is a way to create a timeline for your project. Whatever method you use, having a visual timeline makes it easy to manage, track and share that schedule. Our free project timeline template for Excel is made up of two parts. One captures your tasks, start and end dates and duration in a spreadsheet. The other side is populated by that data on a timeline.

Work Breakdown Structure Template

You can make a CPM schedule without using a work breakdown structure, but if you want to ensure you don’t overlook any activities, it’s not recommended. With our free work breakdown structure template for Excel, you can lay out your project from the final deliverable down and not neglect anything crucial that’ll delay your project execution.

Project Task Tracking Template

Of course, having a CPM schedule is only the start. You have to implement it. In order to stay on schedule, you’ll need to track the execution of your tasks to ensure they align with your project plan. That’s where our free project task tracker Excel template comes in. It captures all tasks and dependencies as well as the start date and planned and actual end date to help you stay on track.

ProjectManager Helps You Stick to Your CPM Schedule

Templates are helpful when creating a CPM schedule, but once you execute it, you need project management software to keep to that schedule. ProjectManager is online project management software that delivers real-time data that help you make more informed decisions as you manage your project’s schedule.

Track Your Progress With Real-Time Dashboards

When you set a baseline to your schedule on our Gantt chart you now are able to monitor your project in real time. The data you review is current to help you catch issues before they become problems. Our live dashboard automatically pulls that data and displays it in easy-to-read graphs and charts showing time, cost, workload and much more. There’s no time-consuming configuration needed as with lightweight competing software. Our dashboard is ready when you are.

ProjectManager's dashboard
Automate Simple Tasks and Focus on Critical Ones

A CPM schedule is divided between critical and non-critical tasks. The latter can still take time. Using our workflow automation frees up your team to concentrate on critical tasks for the project. Set up custom workflows, workflow automation and task approvals to create strict rules for the path of a task. You can define which users can approve the task as it moves through its various stages to ensure that only quality gets through. Make as many triggers as you need to change the status of the task, tags, assignees and much more.

ProjectManager's workflow automation

There are many other features in our software that help you deliver your project on time and within its budget. Whether it’s task management, resource management or risk management, you have control in real time to pivot as necessary to keep everything on track. Plus, customizable reports give you more detail and can be easily shared to keep your stakeholders updated. Don’t make or manage your schedule without our software.


Post a Comment

0 Comments

Close Menu